Thursday, July 30, 2015

DIY Robots + Art! BCA

This week my love of art meshes fully with my maker self as I teach eight little lovelies to make simple circuit art objects.  We started off the week by posing the question, what does a robot look like? 
Paintings on foam core!
Artists rendered all kinds of robots from cute to threatening, and wired up a simple circuit with two LEDs, two button cell batteries, and three pieces of wire.

So proud of his work!

This lesson comes from the inspiring and awesome blog of Tricia Fuglestad, an force of innovation in art teaching. Previously, my students have had bad luck with copper tape- it rips easily, the edges are sharp, and the sticky side isn't always very conductive, so instead we used regular project wire.

A roomful of robots!
The artists had a broad choice of special little LEDs, which meant that while some chose solid color, other LEDs blinked red or slowly shifted through the color spectrum. I taught the kiddos to solder the connections in their circuit so that they would be super solid and nothing could wiggle loose.

No joke- a soldering iron is dangerous. I reteach it again and again, every day that it's in use.
 Next we added motors to the simple circuits, which the students used to create jittering bots that drew, bashed into each other (see the robot battles in the video below), or just blew some cool air at the maker.


These bots brought out their competitive spirit, and they sounded like sportscasters calling the matches to see whose bot would fall down first.


 They gave each other "prizes" in different categories. One in particular was rigged up be really loud (specifically designed by the maker with the idea of irritating his brother), so that one received the dubious honor of "Most Annoying."

Far and away the "Most Adorable and Sparkly"
Some of the bots looked rather spidery... or maybe more like a millipede!


These kiddos did not want to go out to snack. Or to leave after class. Which is not surprising, since kids will even come in on their evening free time to be makers. They were completely absorbed, and each afternoon waved goodbye to their creations until the next morning.


Once students had a good handle on turning a motor on, I let them loose to build whatever they envisioned, but several had specific things they wanted to learn, especially how to use a motor to turn wheels.
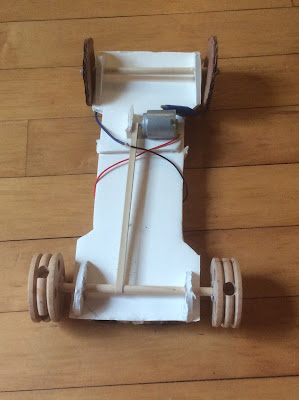
Underside of my car
So, we are building things with wheels. It's pretty simple if you think about it like a car, so that's the example I used. We took foamcore sheets and utility knives to cut out rectangles for the car bodies, little triangles with holes to support the axles, and a rubber band to connect the axle to the motor.  These could be powered by either a 9V battery or a set of 4AA batteries.

Top of my car
Pretty blank, I know. Think about it like a car chassis. You could put anything at all on top of it to make a zooming robot or a tiny parade float.


It's quite speedy too, and we have to generally run to catch them outside. Here's my little lowdown on making one:


We strapped a little bear on our, which my younger thought was hilarious, but try it with just about anything you can make out of cardboard or other sculpture materials to create different types of cars.

Off I go, headed to try my prototype going off the little ramp (made from a block and a book) my little guy just built- hope that bear's seatbelt is on tight!


Sunday, July 26, 2015

Turning A [Cement] Lemon Into [Art] Lemonade!

Ta-da!
Once upon a time, I moved into a house, and it had precious little curb appeal- save for a cluster of flowering hydrangeas- to keep it from being just a big ol' box with cement steps.  I have gardened and window-boxed and planted my way to loving it more, but, oh, those steps.

Our steps.  Even those cute toes and pretty flowers couldn't save them.
 Cement is virtually the universal material for front steps in our area's older homes.  While all of the new construction has pretty wood front porches, we have this set of steps that never sees sunlight, faces north, grows moss, and gets slimy in the rain.

My hostas try valiantly each year to block the view of the monster.
By a series of serendipitous events, I had a surprise week off from both teaching and taking classes this summer, and set about turning my giant cement lemon into lemonade.

It began with a power washer. That alone made my steps and walkway so much nicer that I considered stopping there, but my kids and I had already smashed enough tiles to fill three five-gallon buckets, so there was no stopping. (Note: Children LOVE smashing tiles. You will too- think about whatever is making you cranky and swing that hammer.)  This being the first time I have ever power washed anything, can I just say, wow.  It's so immediate and satisfying, like yanking out a tall weed or vacuuming after several toddlers eat crackers in your living room.

Seriously, who knew?!  I now want to power wash the whole world.
It turns out that tile stores have lots of tiles that they don't want and struggle to give away.  My local store was delighted to offer up an entire pallet of free mismatched three-of-these-and-two-of-those tiles.  Most people buy whole crates of tiles at a time, but I only needed a few of each from their freebie pile.  Perfect.  They were so happy to see the tiles leave their warehouse that they loaded my car with them for me.

Getting underway.
This is how it looked a couple of hours into the process. Promising but daunting. The thin set adhesive was forgiving and slow to set, so pieces could be rearranged several times as needed.  It got easier as I figured out that I should approach it like a puzzle- edges first then fill in the middle.


After a few days, the pieces were on, and I faced the task of grouting. Grouting is hard. Grouting is necessary. Grouting makes me dread mosaics. If I ever have a project like this to do again, it would make sense to pay a pro to do that part, so that I could spend my time doing something nicer, like getting cavities drilled or pouring lemon juice on paper cuts.

Why not stop here?  It looks pretty good... who needs grout anyway...
This is what it looked like when the different steps were at varies phases in grouting- ugly. Lots of hand wringing.  There would have been nail biting too, if there hadn't been so much cement jammed under them.

Yikes.
The edges of the grout were the part I dreaded most. It needed to look straight and crisp. Yes, I know they make special tools for this. Yes, I do actually have those tools, many more than needed, to do this task. But because I.just.can't.do.it, and I am just weird and special enough, it actually made sense to invent a new way.

Frosting my cement cake.
Behold!  A giant pastry bag of grout!  As it turns out, my skills at decorating cakes lent themselves beautifully to creating mosaic steps.  It made edge lines much easier to tackle, and they didn't have the weird varied thickness I was avoiding.


This is not how the pros do it. I frankly don't know how they do it.
Once the steps were dry,  I sponged it down and inspected closely to make sure that water/ice won't seep behind in the winter.

Aren't the striped tiles the best?
 In the end, I decided to do the steps on the side of our house too.  
It should be said- I love them!  Artful, imperfect, and fun.

Wednesday, July 22, 2015

Cool Jewels! - BCA

Last week wrapped up another amazing session with creative and engaged young artists at BCA. The week was spent in a camp called Cool Jewels! Here are some of the highlights.

Sculpey, glass, and metal beaded necklace
On the first day we used Sculpey clay to create beads and pendants, and campers tried six different techniques to layer, twist, swirl, and cut their way to a variety of shapes and colors.  The next day, after the beads had baked, the campers mixed in with glass and metal beads to create necklaces.

Artists learned to add jewelry hardware including  jumprings and clasps
As Burlington is home to the amazing artist Marie Davis, who works in polymer clay, several of these campers were familiar with her work and has a vision for what they wanted to create. Trying to make something beautiful out of this material gives a fresh appreciation for the stunning talent Davis has to create work that looks like this:

Whoa. Fer serious, not in this lifetime could I make anything even close.

I came armed with a list of things to make a mile long, but since we had just fifteen hours together, I let the campers choose the projects that most appealed to them. The next project they selected was to make paper bead earrings. Making these is simple process which begins with upcycling old magazines into tiny rolled and glued beads. The beads could be used ot make both traditional or clip-on earrings.  Behold!

They even put little bells of beads at the bottom, so some of the pairs ring softly as the wearer walks around.
Since it was hot last week, and all of the kids wanted to take off their shoes, we made barefoot sandals.  Essentially, these are fancy little anklets joined to a toe loop, so they appear like the top of a flip flop. Perfect for running around in beach sand or soft grass.


These are pretty simple to create, and all of the ladies got into making several pairs, some matched, some purposely mismatched.


Some of the artists wanted the beads to go higher up on the front of the foot, and to branch around into two separate beaded strands, as you can see below. For these we added a clasp at the back, since they couldn't be removed otherwise.  All these are is hemp string with a variety of beads. Make yourself a pair!


The girls wanted to make big wooden bangles similar to what my DIY Accessories campers made, but with the spin of adding more color with paint pens after the masking and spray painting.


Using rhinestones formed into lengths of cupchain in white, pink, and turquoise, we made some sparkly and funky headbands. First, wrap and hot glue a layer of satin ribbon, and then wrap embroidery floss over the cupchain to hold it in place.


Other headbands included duct-tape bows...


 and fabric flowers.


Campers made "statement necklaces," and thought about how what they wear can communicate parts of their personality to others. Fierce, chic, dainty, bold... they got the idea quickly, and after some reflection, made stunning pieces like this:

So cool and hip.
It's amazing how stylish these campers are, and how some of them have such clear taste at such a young age. This was evidenced by how, at the end of the week, their collections were unique and well-coordinated.

The collection of an eight-year-old artist

Next week will be a dramatic change of pace for the summer, when I will be teaching a DIY Robots art class, blending subjects and skills. Can't wait! Hope you are enjoying the sunshine.

The plentiful and colorful treasures of a rainbow-and-unicorn-loving young lady.


Sunday, July 12, 2015

Munch, Crunch, Art for Lunch!- BCA

Can food be art?  
Should we encourage kids to play with their food?

Pancake Bears! And yes, these painty-looking tables in our photos really are super clean.
    This week at BCA Summer Camp I taught Edible Art. This class dates back to 2007, when I offered the idea for the first time because there was a full kitchen next to one of the BCA classrooms, and as it happens, I love to cook.  Like, really love to cook, baking in particular. Before college I took a semester off to attend the Ritz-Escoffier Ecole de Cuisine and earned a degree in French pastry. (Cue food nerd alarms.)
Cyclops Apple Owl!
 In my own head, food and art have always been linked. As a kid, my mother humored me while I explored all of her amazing kitchen tools and wasted tremendous amounts of food attempting things like carving melons or making green pepper-topped palm trees perched on raw glossy potato islands for a dinner centerpiece. You know, on like a Tuesday, after school. That kind of food nerd. When all of the cool kids my own age were listening to their Pocket Rockers and were calling each other from one of these sweet phones that I never had:


Anyway, I played with my food a lot as a kid, and therefore grew up a pretty experimental eater, and am happy to say that even now in my thirties I still am discovering that I like new foods I thought I hated (black olives? Turns out that they are delicious.) Preparing food is a lot like making an artwork. You have to think about the colors, forms, and presentation. You also have to think about the textures, smells, and how long it will last. 

Cheese Spiders!
Lot of people dedicate their time to turning food into art, especially the proliferating blogs of bento box masterpieces that people are making their children. I believe that there really aren't too many rules with food beyond keeping your hands and prep space clean, and making something that looks yummy enough that people want to eat it. 

And eat it, they do!
Why?  Because it makes eating healthy food more fun. We spend a lot of time telling our kids what to eat, but not making it look especially apealling, and not involving the kids themselves in the process. If you get your child into the kitchen, and ideally into the garden, they will be much more willing to try not only new foods, but foods they have tried fifteen other times and swore they didn't like at all.

Banana Dachshunds, snuggling.
This week my awesome campers cooked up a storm. We used fruits, veggies, breads, cheeses, and all manner of treats- because treats are important too! Here are their amazing self-portrait cupcakes:

Good gracious these are cute. Imagine your child making them for a birthday party, one for each friend coming?
A close-up of a few lovelies:
Those earrings!
That earnest expression!
Several times this week campers professed to disliking certain foods, especially sunflower butter.  And apples are "so boring"!  But together with five mini marshmallows, and I think that there are suddenly a lot of Halloween parties being planned for this fall in Burlington.

Fake Teeth!
Seeing these stuffed into the mouths of campers as faux grins was simultaneously hilarious and slightly disturbing. Both, to be sure.

Animal Crackers
But where is the art historical education?! Oh, pish posh. First of all, it's summer, and not school.  But second, yes, we do talk about artists.  The first one I introduced this week was Jeff Koons, and his hilariously poofey dog sculptures.

Balloon Dog
And naturally, we made it out of grapes and skewers.  It was a technical and engineering feat that offered room for creative expression.

Grape dachshund in progress.
Aren't they hilarious?

These led to all kinds of other objets d'art including pyramids, prisms, and this one that eventually became an octodog.


So play with your food, and let your kids in on the fun.  Open up Pinterest and find some ideas, and maybe they will make you dinner tonight!

Strawberry Sandwiches- bubbling with cuteness, no real fish involved!

Have a yummy summer!