Tuesday, April 25, 2017

Lost in Space

3,2,1, Blast Off!


Explorers in first grade are making art this is pretty (ahem) out-of-this-world! 


In connection with the science unit they are doing in their homeroom on cycles and phases of the moon, these students are using visual art to express additional knowledge that they have learned about space. 


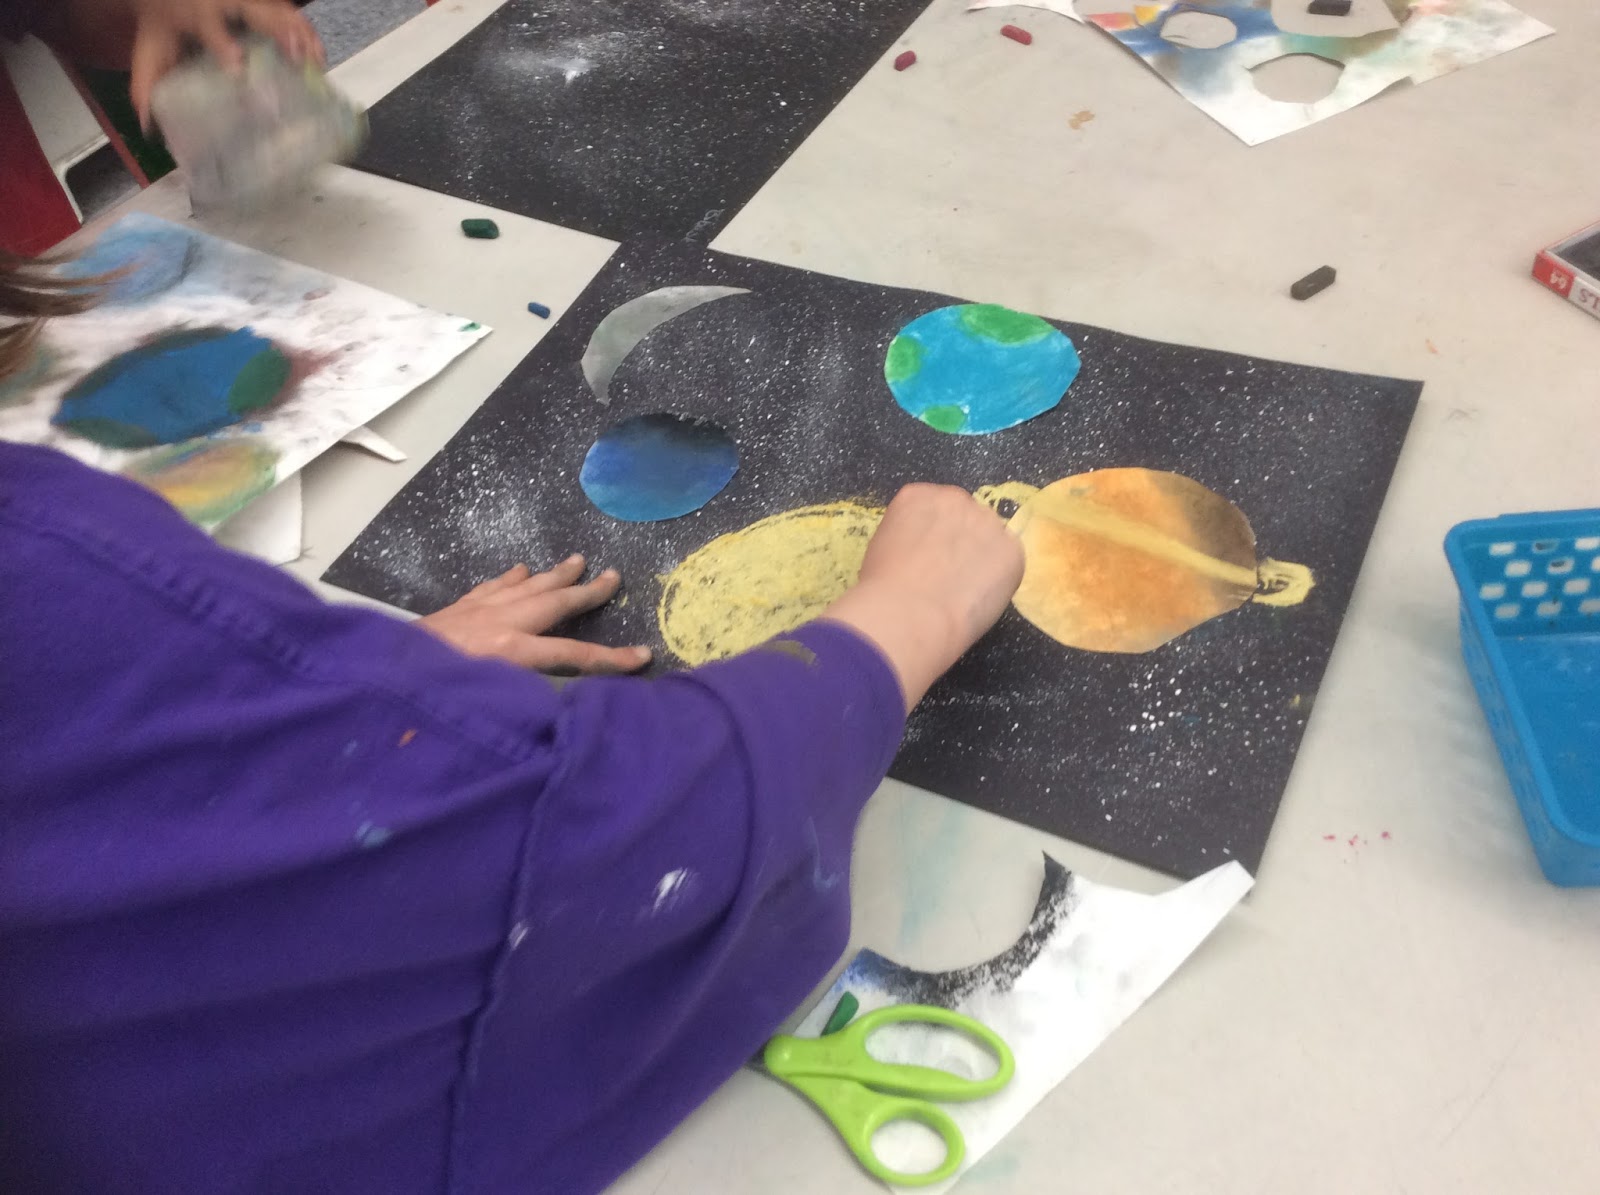
Visual art provides learners a chance to show understanding in a different format than, say, a science notebook or moon-observation journal. In this lesson, students began by using white paint and a toothbrush to create a galaxy of tiny stars on dark paper. That same day, students began to create planets, using white paper and chalk pastels. Many students drew from what they remembered about the light units in art and science classes and attempted to make their planets look very spherical with different shades of pastel.


The great thing about beginning the planets on separate paper is that if there is a perceived mistake, smudging outside of their circle, or a planet that the artist doesn't like, it can simply not be cut out and added to the background. Planets which the students were pleased with were cut out and glued on once the backgrounds were dry.

Because this lesson is intended to give students another place to express their learning about space, we talked about what phenomena and objects are objectively observable and true about space. While you might wonder if they were disappointed not to put a face on their sun or an alien on the moon, they were not, as they were excited to be asked to "show what you know" about our galaxy.


Artists included additional objects of their choosing in their images, including things such as the moon (in different phases), constellations, satellites, meteors, rockets, the sun, and more.


Some artists went above and beyond integrating what they remembered from the light unit, making sure that the bright sides of their objects, such as planets, faced the sun, to create a more realistic model of how light would act on those objects.


Many students used strategic cropping of their objects to suggest that the vastness of space is endless, and let their shapes run off the edge, like the moon in the work below.


This lesson offers so many opportunities to practice skills first graders are building, especially cutting curves, making complex shapes (like stars), tracing an object (circular things like yogurt containers were traced for planets), and blending/mixing colors.


"The sky is the ultimate art gallery just above us."
Ralph Waldo Emerson

Sunday, April 23, 2017

Go, Science! My New Lesson in the Latest Scholastic Teacher

In their newest issue, Scholastic Teacher Magazine has just published my light up origami lesson, which I blogged about here last year. My issues arrived on the day of the March for Science!

Yippee!  Enough copies to share in my classroom!
The part of this news which really excites me is the idea that more children in other places may get the same opportunity to merge art and technology in school.


This is the second art+tech lesson of mine they have published this year.  Here is the blog link to the first lesson, Light Up Magic Wands. Go science!


Wednesday, April 19, 2017

Pinch Pot Creatures

   Children love clay. 
SO much.


For many years, EES students have spent a week per year heading to BCA's clay studio, but, alas, BCA is in the middle of a move to a new home on Pine Street, and we will not go this year. This is approximately what the children looked like when I told them this news.

Pixar shows it well.
In flew the PTO to rescue our students, by purchasing a couple hundred pounds of air-dry clay!  Thank you families, you saved the day! While I don't have a kiln, we were able to build lots of non-utilitarian sculptures and vessels, which while they are not safe for food, look totally awesome.


BCA has primarily had students throw clay on the wheel, so for many of these young artists, hand-building with clay is all new. The techniques I wanted 3rd and 4th graders to have include slipping and scoring to attach parts, and the know-how to make a basic vessel like a pinch pot.


The class looked at many examples of how artists use pinch pots as a basic form for a bigger sculpture, and were inspired to make a variety of aliens, creatures, animals, and monsters.


The artist of the work above wanted hers to be useful, so she poked several holes in the back to put lollipop sticks into, to display candy.

The back, with five holes for lollipops.
Students discovered that like with all clay, fired or air-dry, pieces which are not well attached are prone to falling off. Fortunately, students could hot-glue on anything which detached.


Lots of artists' work evolved into multi-media sculptures, adding details like feathers, pompoms, or wire.
Vampire bunny
Long wire eyelashes
Some artists made "minis" to either attach to their main pinch pot, or even to sit inside of it.

Mama and baby frog with wire "fly"
Stacked pinch pot alien
The "Baby" creature sits inside of, and can be removed from, the larger one.
One artist even decided to make hers conjoined, creating distinct faces and designs for each part.


We used SchoolSmart grey clay, and while its working properties are very similar to that of real clay, it was more crumbly when dry than expected and far more fragile than the real deal. If you have had success with a different brand, please share about it!

For students, it was just so exciting to finally have their hands into clay again, that they didn't mind the texture one bit. They look forward to using it again!


Saturday, April 15, 2017

Clay Dessert Containers

If you haven't eaten in a while, go get a little snack and come back to this later. You will not want to read this post while hungry.

I warned you.
Most humans love food. So it is pretty easy to get a group of children worked into a frenzy over the idea that they will be creating homages to deliciousness.


The real agenda of the project was getting students to consider how to create hollow-form vessels of three dimensional objects. Students used a planning sheet to draw both what their work would look like from the outside, and also what shapes would be needed to create the object out of clay, as a container.
A Chesster ice cream cookie sandwich
Consider this cookie sandwich, above. To create this object as a hollow-form container, the student drew a plan that showed he would need two circles of the same diameter, and a long, rectangular strip of a length slightly shorter than the circle circumference. Clay plan in hand, he created this accurate work out of clay slabs which he rolled and stretched on his own.


The plans were created by each artist prior to beginning in clay. The student who made the cake above drew a plan to include two same-size triangles, two rectangles that shared their long side with the triangles, and a square for the back panel.


The goal of this approach was to overcome the guess-and-check approach that can lead to frustration and endless restarting. Using relative measurement (the length of the rectangle needed for this cupcake wrapper is the same as the circumference of the circle for the bottom) lets students make a plan without to much pressure- no rulers needed.

Hot cocoa, whipped cream, and mini-marshmallows!
Math and geometry-minded students excelled at this approach, and plenty of creative space was left for students to create an idea truly their own. I have often seem this project done with a lens I think is too narrow (everyone is expected to make a cake, or everyone makes a pancake stack) to allow for the kind of individual expression and differentiation I look for in a lesson.


The simplicity of the approach- create a three-dimensional, hollow container using your knowledge about geometric forms and faces- lets students explore a wide range of responses at their own level.


Our inspiration artist was Wayne Thiebaud, who is a painter. He is an American contemporary artist, currently 96 years old, and is well-known for his artwork depicting enticing, colorful objects, particularly food.
Cannoli
The approach also let students run into creative problems, and to have to search for solutions. The artist who made the cannoli above rebuilt this project twice, after finding problems engineering the half-column forms proved more challenging than he expected. But I emphasize as an art teacher that children finding creative solutions to the problems they encounter is, by far, more important than whether the end-product is what the artist initially envisioned.


 It's pretty certain that by now you want dessert, even if you did take the snack advice at the beginning. Life is short, go have a treat!


Tuesday, April 11, 2017

Digitally Colored Grade 2 Self-Portraits!

This is a self-portrait lesson started out traditionally, then took a high-tech twist using iPads and a new-to-me app that I love!


Like many self-portrait lessons, students began by learning about the proportions of the face, and drew themselves in pencil. 


Teaching facial proportion, and having a good foundational understanding of it, allows artists to take creative risks through altering those proportions- think of comics and caricatures- exaggerating a specific feature or area to communicate an idea to the viewer.


But teaching proportion in self-portraiture does not have to be repetitive or boring! This lesson is getting students very excited, and several students are reporting working on self-portraits at home right now. 

When they were finished with their pencil drawing, students outlined in black markers and erased the pencil. Why is this lesson exciting to students? Because of the next part- we colored them digitally on iPads, using an app I found recently, called Colorscape! (Other art teachers: if you have used it with your students, tell me about what you did with it! )


Artists used iPads to take a photo of their artwork and upload it into Colorscape, which turns each drawing into a digital coloring page. 


Students experimented with virtual paintbrushes, pens, watercolors, and paint bucket tools in the app to color their work digitally.


 The original drawings are shown side-by-side here with the finished Colorscape work.


This self-portrait lesson could not have been any cooler!  It was also worked incredibly well for different developmental levels. The iPad technology worked universally for the student population, allowing students to really use virtual materials and tools at their own level.


Students who were ahead could continue to experiment with tools and techniques, and produce multiple finished images, such as these:
                                        

This app also works very well for non-digital end-products as well. Several students in other lessons (like landscapes, for example) are using the app in art to take a snapshot of their work and color it digitally to help them make decisions about which media to try on paper- such as whether to use marker or watercolor on their landscape, and what colors to try in each area. I look forward to students doing lots more with this technique!